Thursday, January 10, 2013

How to Joint a Chicken

All going to plan, over the next month or two I will be posting recipes from classes I have been ttaught over the past year. In that time I have had the opportunity to cover quite a bit of ground, so will start including a few more instructional "cheffy" things which I hope you will find useful. Something here today that covers an ingredient quite commonly used in Mexico, the bird.

The idea of butchery and knife skills to me, is to be able to control the produce you buy and use as you become less reliant on others to prepare it. There is also something quite satisfying about doing this sort of thing, learning the anatomy of a bird or fish and seeing the animal as a whole which I think is an important cognitive experience for any serious cook.

This basic breakdown will render the bird broken down into two breasts, two wings, two marylands and a carcass for stock. You could continue the process to yield two drumsticks and thighs separated out, but I didn't think of that when I was doing it so no photos of that step I'm afraid.

Let's get to it.

How to Joint a Bird

 
1. Place the whole chicken on a clean board with the tail end facing toward you.
2. Make an incision one side of the breastbone cartilage, starting at the neck. In one motion, cut down towards the tail keeping the knife following -and guided by- the breastbone.   
3. Use the knife to separate the breast meat from the rib-cage. Gently push the meat away with your other hand to give a better view of where you are cutting, and leave as little meat as possible on the carcass. 
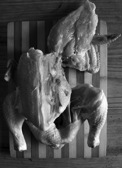
4. Continue cutting and folding the breast, and eventually only the shoulder joint will hold the breast on. Fold the breast back to give a clear view. 
5. Push the tip of your knife into the joint and it will separate easily. You are not cutting bone, only making a small incision through the cartilage. 
6. Flip the bird over and place your thumb on the hip joint. Pull the drumstick towards you until the joint pops out. You can now make a cut straight from the top of the maryland to the tail. Be sure to cut around and include the oyster. Repeat steps 1-6 on the other side of the chicken. 

A great recipe for Helado de Cajeta coming next week. Thanks as always for checking in.

Sunday, January 22, 2012

X'ikil Pak, a Mayan Dip


Served here with fresh made tortillas and boiled egg, simple and delicious.

Something very nice below from a class I taught a few weeks back. X'ikil Pak (See-keel Pack) is a nutty, sweet and bright "dip" composed of many of the usual suspects. This concoction does benefit from being stone ground in a molcatjete (Mexican mortar and pestle), but of course we are not all blessed with the patience or physique to perform such a task. So then, the blender will work well but do observe the technique described to get a good consistency.

X'ikil Pak

1 cup raw hulled pepita
2 egg tomato (around 200g)
1 clove of garlic
1/4 of a white onion (around 100g)
100ml water
chopped coriander
sea salt, to taste

  1. Toast the pepitas gently on a comal (or in a dry pan), moving frequently to ensure an even heat. They will be ready when they are lightly golden and somewhat puffed up (when raw they are quite flat, the sides will bulge). Remove from the pan and let cool.
  2. Toast the tomato, onion and garlic on a comal.
  3. Place the cooled pepitas in the blender (or molcajete) and process until quite fine, almost to a powder consistency. Add the water, salt, onion and garlic and blend again until smooth. Roughly chop the tomato and add along with the coriander. Pulse the blender a few times, leaving the tomato a little chunky. Serve with fresh tortillas.

Tuesday, October 18, 2011

Diana Kennedy Comes to Town

Diana Kennedy is often described as "the Julia Child of Mexican Cuisine". She has authored eight books and is recognised as the world's leading authority on Mexican food. Her most recent book, Oaxaca al Gusto was awarded the prestigious James Beard Cookbook of the Year award for 2011, and is one of the most determined pieces of work I have ever seen.

Hence, I was pretty thrilled to have the opportunity to cook with her in Sydney a few weeks ago, in a demonstration class at the Essential Ingredient Sydney. Diana prepared Sopa Tarasca tipo Conde, Camarónes en Pipian (recipe below) and a whole Barramundi in the style of Huanchinango a la Veracruzana.


Mrs Diana Kennedy and myself, pondering the pot of prawns.

The food was all stunning, and her detailing of the process and concepts behind each step of the preparation. It was quite an eye opening experience over all. Not quite as eye opening as the next day, when my beautiful son Liam was born, a healthy 8 pounds and perfect. It has been quite a year.

The following r
ecipe appears in The Essential Cuisines of Mexico by Diana Kennedy, published by Clarkson Potter/ Publishers, 2000.

Camarones en Pipián

Shrimps in Pumpkin Seed Sauce


Serves 6-8

675g Medium size shrimps, unshelled

2 ½ cups cups cold water, approximately

1 teaspoon salt, or to taste

1 cup (250ml) raw pumpkin seeds (about 115g)

1 small bunch cilantro, roughly chopped

4 fresh serrano chiles or any fresh, hot green chiles, roughly chopped with seeds

½ small white onion, roughly chopped

1 tablespoon unsalted butter

2/3 cup thick sour cream


Shell and devein the shrimps and set aside. Put the shells, tails and heads, if any into a saucepan, add the water with salt and cook over a medium heat for about 20 minutes, to extract the flavour and make a light broth. Strain and discard the shells, reserving the cooking liquid. Allow the liquid to cool a little. Add the shrimps and cook over a gentle heat for about 3 minutes, or until they are just turning opaque. Drain the shrimps, reserving the broth.

In a heavy, ungreased frying pan, toast the pumpkin seeds lightly, stirring them often, until they swell up and begin to pop about-do not let them brown. Set them aside to cool and then grind them finely in a coffee/spice grinder. (Alternately they can just be added to the blender with the broth in the next step, but the sauce will not be as smooth.)

Place the shrimp broth, pumpkin seeds, cilantro, chiles, and onion in a blender and blend together until smooth.

Melt the butter in a heavy saucepan. Add the blended pumpkin seed sauce and cook over a very low heat, stirring and scraping the bottom of the pan constantly, for about 3 minutes. Stir in the sour cream, adjust the seasoning and just heat through-about 3 minutes. Then add the shrimps and heat through for another 5 minutes. The sauce should be of a medium consistency. Serve immediately.

Serve with fresh, hot tortillas or crusty French bread. Despite the temptation to do so, it is better not to serve it on top of rice or all that lovely sauce will be sopped up and lost.

NOTE: This pipián can be prepared ahead up to the point of adding the shrimps. I do not suggest freezing this dish.


¡Andale Pues!

Monday, July 25, 2011

Huachinango a la Veracruzana


Veracruz lies nuzzled in the southern part of the Gulf of Mexico, not too far away from Cuba and Hispaniola from where Cortéz sailed in 1519. The area was one of the first conquered by the Spanish, and has long had quite a distinct character, as I suppose so many port cities do. The mix of the indigenous history, European culture, African slave elements and even the strong ties to Cuba's recent history make this a fascinating place.

The heat of the city in June is pure oppression, with the pavement scorching and baking, and helados half-melted before they are even paid for. My first trip there, I resolved to spend evenings in the Zocalo watching elderly couples dressed in white dance like swans, as I waited until it had cooled enough to consider a meal.

So around 10 o'clock every night, Juanita cooked for me in her little restaurant two blocks from the square. She gave me this recipe, which varies little from many others you might find in any given book but for the fact she chars the tomato to begin. Also she preferred a single red chillie, rather than a pickled jalapeño as is more commonly used (incidentally, jalapeños are from Veracruz state, and named after it's more northern city, Xalapa).

Huachinango a la Veracruzana
Red snapper in tomato, olive and caper sauce

1 red snapper, about 1kg
2 egg tomato
1/2 small white onion, sliced
1-2 cloves garlic, sliced
2 bay leaves
2 tablespoons capers, with a little of the brine
8 green olives
2 sprigs thyme
a pinch of dried Mexican oregano
cracked black pepper
1 small red chillie, cut in half
juice of 1 lime
1/4 cup olive oil
salt

  1. Trim the fins from the snapper, and score the sides with a sharp knife.* Rub salt into the cuts, then rub the juice of half a lime. Leave to sit for one hour.
  2. Char the tomatoes on a comal or under a grill. When soft, blend with 50ml water.
  3. Heat the olive oil in a pan until hot. Place the fish in the pan, and cook for around three minutes until the skin is nicely coloured.**
  4. Turn the fish over and cook the second side to the same degree. Remove the fish to a baking tray.
  5. Lower the heat and ad the onion to the pan, cook for around one minute, then add garlic and bay leaves. Cook a further minute, then add remaining ingredients including blended tomato and lime juice. Bring to the boil then simmer for two minutes.
  6. Pour over fish and bake for 15 minutes at 190º.
  7. Serve with red rice and a little olive oil.

*My snapper was a little monster and wouldn't fit in the pan, so I trimmed the fillets off. It's not as hard as it looks: Use a sharp knife to cut into the fish near the backbone, then just slowly follow the contour of the bones, peeling the fillet back as you go. If you get stuck, change direction and keep cutting until you have removed it cleanly. Flip the fish over and repeat the process. You may find the second try will be a little easier, but just go slowly and please, use a sharp knife or you will just destroy the little fellow. Pictures of my simple process below.

**To cook fillets, seal the flesh side first after seasoning well. When nicely coloured, flip over gently and cook skin side until crispy. Remove from pan to a plate, cook the second fillet the same way, then remove. Follow step 5 of the above recipe, but reduce the sauce a little further, then pour over the fillet.


Cut in slowly along the backbone, peel the fillet away so you can see the bone you are cutting the flesh from.

Tuesday, July 5, 2011

Dear Mrs Harvey


Pretty excited about the sweet sweet candy up there.

On May 21st of this year Karin and I got married. We were not able to invite everyone we would have liked, as it was a small event without all the space that would have been required. Sad as that was, Simon and I cooked the whole menu ourselves so I was glad there wasn't too many more.

It is a chef's curse to cook at one's own wedding, and I know more than a few who have done it. I decided to go back to my first culinary digs and cook Italian. Slow, tasty, hearty and simple. The recipe from the braised short-rib follows along with a few photos of the day, including the piñata which was the only thing Mexican on the menu.

Thanks to all our friends who made it, and those we couldn't invite but remembered on the day.

Karin & Travis Harvey


Braised Beef short rib in Sangiovese

1kg organic beef short rib (or shin)
1 cup diced brown onion
1 cup diced carrot
1 cup diced celery
5 cloves of garlic, sliced
3 bayleaf
4 sprigs of thyme
1 teaspoon fennel seeds
3 tablespoons tomato paste
1 tin whole peeled tomato (400g or 12oz approximately)
300ml good Chianti, Sangiovese or Shiraz
Chicken stock
Salt, freshly ground black pepper
Good extra virgin olive oil (Cobram Estate was used)

  1. Cut the short rib into portions, trim any thick fat then season well with lots of salt.
  2. Heat a pan with a decent amount of olive oil, then sear the meaty surfaces of the rib until nicely coloured. Turn the rib and sear all sides evenly. Remove from the pan to a cast iron or braising dish. If much fat renders into the pan, pour some off but use the rest to finish sealing the meat.
  3. When you have finished searing the ribs, pour out the excess fat and add a good slug of olive oil, add the vegetables and cook gently without colour.
  4. When they have softened, add the garlic and other herbs and spices. Cook until fragrant. Add the tomato paste and wine and bring to the boil stirring frequently.
  5. Add the tinned tomato and season. It should seem a little under-seasoned, and will balance out during cooking with the beef.
  6. Pour the liquid over the ribs, and top up with chicken stock until nearly covered (but not quite).
  7. Place a lid on the cooking dish and bring to the boil before placing in the oven at 160 for 2½ -3 hours.
  8. When the beef is really tender but still clinging to the bone, carefully remove it from the liquid with tongs. Pass the liquid through a sieve and reserve, pressing all the juice out of the vegetables before discarding.
  9. Any remaining vegetables you may have had after measuring out the braising quantities, can now be sautéed gently in a little more olive oil. When they are soft, add the liquid and adjust the seasoning and consistency. Now reintroduce the beef to the sauce and heat gently to serve. Serve with soft polenta, orange gremolata and a little more very good olive oil.

Menu and place settings.

Soft Polenta

1 cup polenta
3-4 cups water
2 cloves garlic, crushed
100g Butter
100g freshly grated Grana (or Parmesan)
lots of salt

  1. Bring the water to the boil in a large pot with garlic and salt (about 2 teaspoons).
  2. Rain in polenta, whisking all the while. Bring to the boil again, then turn down the flame to a very low heat.
  3. Keep stirring or whisking for as long as specified on the packet (instant will take about 10 mins, traditional polenta about 50).
  4. Add butter and parmesan and mix through. Check seasoning and serve.


Menu with details: click to read.

Orange Gremolata

3 cloves garlic
1 bunch flat leaf parsley
1 orange
1 lemon
cracked pepper

Method 1 (simple)
  1. Peel the garlic, pick the parsley leaves and zest the orange and lemon with a microplane or peeler.
  2. Roughly chop it all, then place in a small food proccesor with pepper and 100ml extra virgin olive oil. Blend till smooth.
Method 2 (hard but better. And prettier)
  1. Pick parsley and chop finely, Reserve.
  2. Peel garlic, then slice 1mm thin on a mandoline. Stack the slices of garlic slices to a hieight of four slices, then cut a julienne of the same width (1mm). When finished, turn the julienned garlic around ninety degrees and cut again, achieving a 1mm dice of garlic. Add to the parsley.
  3. Using a vegetable peeler, remove the rind from the citrus. Fillet any white pith from the strips with a paring knife, then use a cooks knife to cut a julienne of the same size. Repeat the garlic process to achieve a fine dice.
  4. Your proportions should be one part garlic, one part zest, two parts parsley. Add a little cracked pepper and mix well.


Simon, after cooking with me for two days.

Tuesday, May 17, 2011

Tomatillo Salsa


The bounty of the warmer months strained the branches of our little plot’s chilli and tomatillo plants, and last week we said goodbye to them as we moved from our house to a little flat in Sydney. I do wonder what the next tenants will make of my habanero plants, and the terror they may inflict. Curiosity may well kill the cat yet, or at least her owner.

Stranger still they might find these beautiful tomatillos, hanging like lanterns from spindly branches, entwined amongst splintered stakes. I collected all that I could of my first ever harvest, and have put them to good use since.

The tomatillo (AKA miltomate, AKA tomato verde) is a member of the nightshade family along with chilli, potato, aubergine, tobacco and of course tomato. It is more closely related to the Chinese gooseberry than the tomato, though its pulpy seedy flesh does bare quite a resemblance to the latter, if not in colour than in texture.

It’s tart, piquant flavour lends itself well to lighter and more delicate dishes; it marries well with chicken, seafood and creamed sauces. It is often married with pork, when its acidity is used to cut the meat’s fattiness.

Two simple uses follow. I've constructed a little memelita topped with black bean puree and chicken in tomatillo sauce, topped with Arból salsa. For more on the memelita, look here.


Pollo en Salsa Verde
Shredded chicken in a lightly spiced tomatillo sauce

Makes 10 memalitas
200g shredded chicken
200g tomatillo
1 red Jalepeño chilli, seeds removed
2 whole allspice
2 clove garlic
a pinch of ground cumin
1 teaspoon thyme
nearly a teaspoon of salt
1 small white onion, finely diced

  1. Place the tomatillo, chilli, allspice and garlic In a medium sized saucepan and cover with water. Bring to the boil and simmer till soft. Use a slotted spoon to remove into a blender jug and add a little of the liquid. Add thyme, cumin and salt and blend till smooth. It should have a runny consistency.
  2. While still warm, pour over the shredded chicken and stir through. Add a little more of the reserved water if needed.
  3. Add diced white onion and let sit for half an hour before use.


Salsa de Arból
Fiery arbol chile sauce with tomatillo

1 tablespoon of vegetable oil

10-15 chiles de arból

1 small clove garlic

3 tomatillos

water, as needed

½ teaspoon salt

  1. After wiping the chilies clean, warm them gently in a pan with the vegetable oil. Fry the chilies softly until they are lightly fragrant (30-60 seconds).
  2. Toast the tomatillos slowly on a comal or skillet, turning occasionally to ensure even cooking. Some blackening is desirable.
  3. Place the chilies in the blender jar with the tomatillos, garlic and salt and enough warm water as is needed to cover them. Let sit for ten minutes, in which time the chilies will soften.
  4. Blend until smooth, and then check seasoning.

Sunday, April 3, 2011

Salsa Pepian


If by definition, food must yield energy and sustenance, one might wonder whether if a 50 ingredient mole negro should be regarded more as a pastime than a meal. On an energy expended vs. energy gained basis (at least if milling the ingredients by hand), you must certainly be going backwards metabolically. Without a doubt a pleasure to sit down to, it is nevertheless the definition of a chore to make.

Not so the simple Pepian. Were I a less ambitious fellow, it would certainly be my "go to" mole, one that is ready with little more than a toast and a blend, and delicious to boot. The following recipe was taught to me by the lovely Doña Carmen in Quetzaltenango, Guatemala, and employs the Mayan technique of toasting pumpkin seeds for a nutty, rich flavour. The addition of sesame seeds make this a slightly hybrid recipe: sesame was introduced by the Spanish, who took it from the Moors, who took it from the peoples of Sub-Saharan Africa millennia ago.

Here I have used the un-ripened Zebra Tomato from my garden, in place of the tomatillos originally specified. They are by no means the same thing, but the result was excellent nonetheless. A little fresh salmon fillet, diced and tossed with olive oil, sea salt and orange juice and seared quickly. Some pickled Yucatecan onions, and you've got quite a taco.


Salsa Pepian


500g tomato
200g tomatillo or green tomato
100g white onion
60g hulled pumpkin seed
60g sesame seeds
3 whole allspice
2 chile arból
salt
200ml chicken stock

  1. Place the tomato, tomatillo and onion in a small pot and cover with water. Bring to the boil then reduce to a simmer. As each item softens, remove and place in the blender jug. The tomatillo will usually take 2 mins more than the tomato, the onion slightly longer still.
  2. Toast the pumpkin seeds in a medium pan, tossing frequently until golden. Remove, then add the sesame seed and toast. When nearly golden, add the allspice and chile arból. Add to the pumpkin seeds, then place all ingredients in the blender jug with stock and salt.
  3. Puree for 2 minutes until very smooth. Often served with braised pork, poached chicken or white-fleshed fish.